环境: Ubuntu 22.04.1
编译kernel版本: 5.15.86
官网资料
clangd官网
busybox官网
qemu官网最新文档
qemu 6.2.0文档
代码阅读
vscode + RemoteSSH插件/WSL插件 + clangd插件 + 编译数据库
编译数据库采用bear工具,在执行内核编译的make命令前添加bear命令即可(编译kernel前,先使用make menuconfig选择各种特性)。
注意clangd与vscode默认推荐的microsoft的c/c++插件C/C++ Extension Pack有冲突,如果有安装该插件,请先禁用。
clangd依赖后台的clangd server,通常情况下vscode会自动提示下载。
clangd配置1
2
3
4
5--compile-commands-dir=${workspaceFolder}
--background-index
--completion-style=detailed
--header-insertion=never
-log=info
qemu模拟内核启动
安装交叉编译工具链
apt install gcc-aarch64-linux-gnu (x86环境编译kernel的arm64版本需要)
在下面编译 busybox 和 kernel的 arm64版本时,在编译前要先配置
ARCH和CROSS_COMPILE环境变量
export ARCH=arm64
export CROSS_COMPILE=aarch64-linux-gnu-
busybox的编译
busybox官网下载稳定版本,如https://busybox.net/downloads/busybox-1.33.2.tar.bz2 ,解压后执行 make menuconfig,并修改为编译静态文件
1 | Settings ---> |
然后执行make和make install命令,会在busybox根目录下生成 _install 目录,rootfs就是基于该目录制作。
x86_64的rootfs制作
1 | baoze@baoze:~/workspace/debug/busybox-1.33.2-x86$ dd if=/dev/zero of=rootfs.img bs=1M count=10 |
rootfs.imag就是x86的rootfs文件
arm64的rootfs制作
在busybox的_install目录中,创建 etc dev lib 目录
创建etc/profile文件1
2
3
4
5
6
7
8#!/bin/sh
export HOSTNAME=qemu
export USER=root
export HOME=/root
export PS1="[$USER@$HOSTNAME \W]# "
PATH=/bin:/sbin:/usr/bin:/usr/sbin
LD_LIBRARY_PATH=/lib:/usr/lib:$LD_LIBRARY_PATH
export PATH LD_LIBRARY_PATH
创建etc/inittab文件1
2
3
4::sysinit:/etc/init.d/rcS
::respawn:-/bin/sh
::askfirst:-/bin/sh
::ctrlaltdel:/bin/umount -a -r
创建etc/fstab文件1
2
3
4
5
6
7#device mount-point type options dump fsck order
proc /proc proc defaults 0 0
tmpfs /tmp tmpfs defaults 0 0
sysfs /sys sysfs defaults 0 0
tmpfs /dev tmpfs defaults 0 0
debugfs /sys/kernel/debug debugfs defaults 0 0
kmod_mount /mnt 9p trans=virtio 0 0
创建etc/init.d/rcS文件,并修改文件权限为7771
2
3
4
5
6
7
8
9mkdir -p /sys
mkdir -p /tmp
mkdir -p /proc
mkdir -p /mnt
/bin/mount -a
mkdir -p /dev/pts
mount -t devpts devpts /dev/pts
echo /sbin/mdev > /proc/sys/kernel/hotplug
mdev -s
在dev目录下执行mknod console c 5 1命令
拷贝lib文件 cp -a /usr/aarch64-linux-gnu/lib/*.so* lib/
arm64的rootfs采用initramfs方式编译到内核文件中,剩余操作在内核时执行
x86_64内核编译
拷贝ubuntu系统的config文件到内核根目录 cp /boot/config-5.15.0-58-generic .config
执行 make menuconfig 命令
1 | Processor type and features--> |
执行 make 命令
arm64内核编译
通过make defconfig获取arm64的默认配置
执行make menuconfig修改编译配置1
2
3
4
5
6
7
8
9
10
11
12General setup --->
[*] Initial RAM filesystem and RAM disk (initramfs/initrd) support
(./root) Initramfs source file(s)
(0) User ID to map to 0 (user root)
(0) Group ID to map to 0 (group root)
Kernel Features --->
[ ] Randomize the address of the kernel image
Kernel hacking --->
[*] Kernel debugging
Compile-time checks and compiler options --->
[*] Compile the kernel with debug info
[*] Provide GDB scripts for kernel debugging
在根目录创建root目录,将busybox中_install目录内容拷贝过来,然后执行make即可。
如果dev目录下的conole文件copy失败,需要在root下重新创建。
qemu启动内核
安装qemu,
apt install qemu-system-arm qemu-system-x86_64,版本为6.2.0qemu启动arm内核
qemu-system-aarch64 -m 2G -smp 1 -cpu cortex-a57 -machine virt --nographic -kernel arch/arm64/boot/Image -append "rdinit=/linuxrc nokaslr console=ttyAMA0 loglevel=8"qemu启动x86_64内核
qemu-system-x86_64 -m 2G -smp 1 -kernel arch/x86_64/boot/bzImage -hda ./rootfs.img -append "root=/dev/sda console=ttyS0" -nographic
内核调试
安装多架构的gdb apt install gdb-multiarch
qemu启动内核时调试
qemu启动内核时,添加 -S 和 -s 参数 qemu-system-aarch64 -m 512M -smp 1 -cpu cortex-a57 -machine virt -kernel arch/arm64/boot/Image -append "rdinit=/linuxrc nokaslr earlyprintk console=ttyAMA0 loglevel=8" -nographic -S -s
-s shorthand for -gdb tcp::1234
-S freeze CPU at startup (use ‘c’ to start execution)
打开另外一个窗口1
2
3
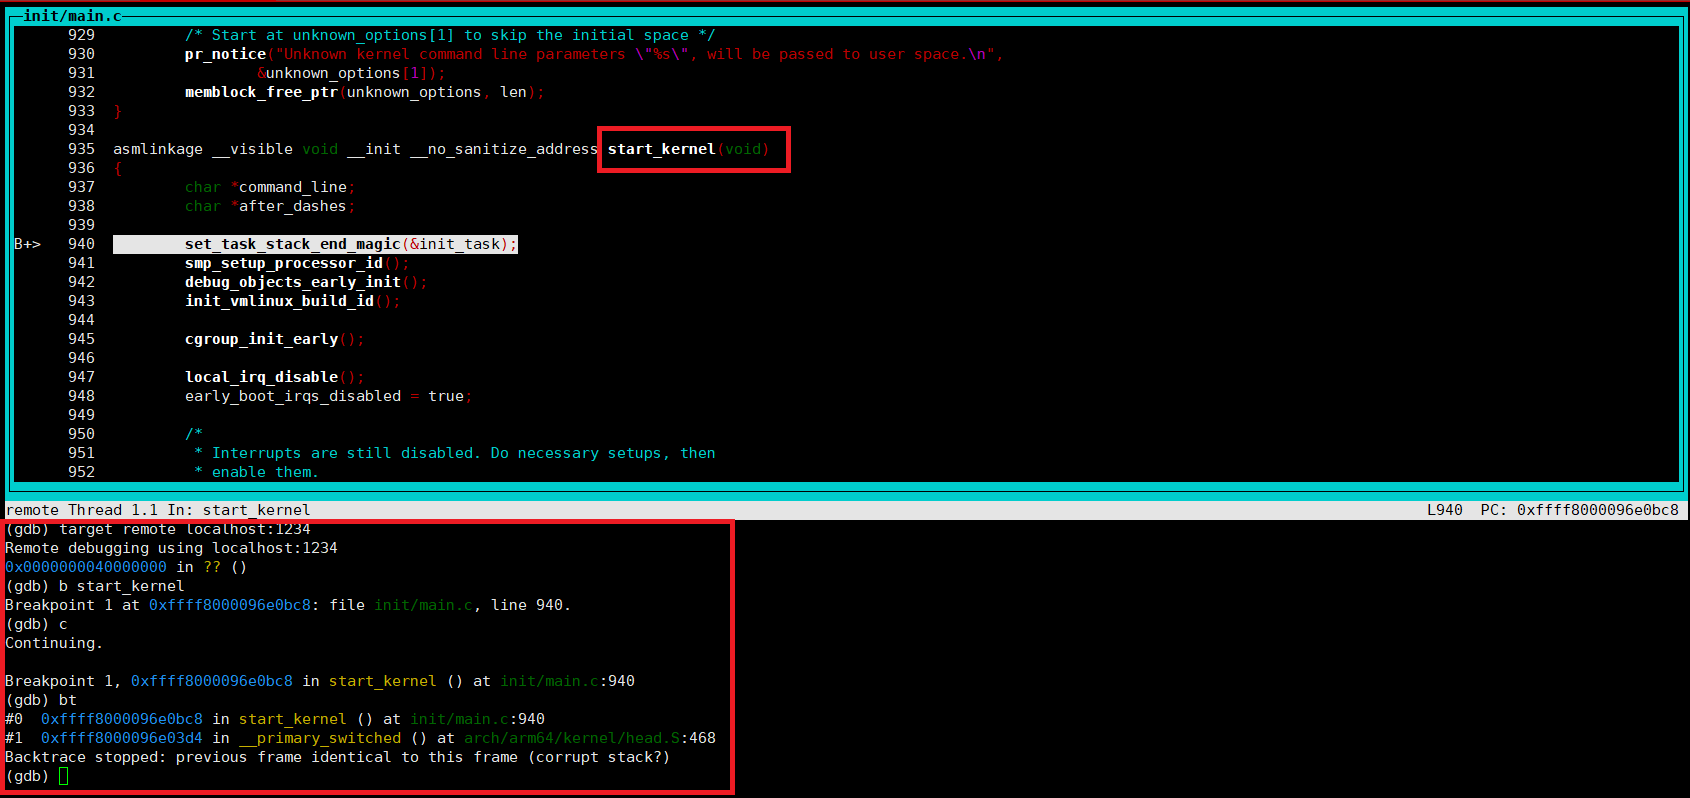
4baoze@baoze:~/workspace/kernel/linux-5.15.86-arm64$ gdb-multiarch -tui ./vmlinux
(gdb)target remote localhost:1234
(gbd)b start_kernel
(gdb)c

qemu正常启动内核后调试
qemu根据命令(不带-S 和 -s)正常启动内核后,可以通过组合键 ctrl + a -> c 进入qemu的monitor控制台,然后执行gdbserver命令
在另外一个窗口中执行gdb-multiarch命令,然后链接到qemu端就可以了,操作同前。
从monitor控制台切换回终端也是
ctrl + a -> c组合键
vscode调试
安装C/C++插件,在.vscode/launch.json中添加以下内容
1 | { |
在vscode启动debug,打断点后,再执行qemu命令。
C/C++ 插件与clangd插件冲突,使用C/C++插件的时候要先将clangd插件禁用。
常见问题
手动在远端服务器安装clangd服务
下载最新的clangd软件,如clangd-linux-15.0.6.zip
在远端机器解压后,在vscode的clangd配置中,修改Clangd: Path到远端机器的解压目录,如/usr/local/clangd-15.0.6/bin/clangd。
arm64版本编译数据库不生效,clangd日志打印E[02:47:40.208] Failed to prepare a compiler instance: unknown target ABI 'lp64'
修改compile_commands.json文件,删除"-mabi=lp64",行,然后reload window。
qemu模拟nvme设备
添加nvme设备,并自动创建一个nvme namespace关联到nvme设备上
1
qemu-system-x86_64 -drive file=nvm.img,if=none,id=nvm -device nvme,serial=deadbeef,drive=nvm
1
2
3
4
5
6/sys/devices/pci0000:00/0000:00:04.0/nvme
/sys/devices/pci0000:00/0000:00:04.0/nvme/nvme0
/sys/devices/pci0000:00/0000:00:04.0/nvme/nvme0/nvme0n1
/sys/devices/virtual/nvme-subsystem
/sys/devices/virtual/nvme-subsystem/nvme-subsys0
/sys/devices/virtual/nvme-subsystem/nvme-subsys0/nvme0添加nvme设备,创建两个namesapce关联到该设备
1
qemu-system-x86_64 -device nvme,id=nvme-ctrl-0,serial=deadbeef -drive file=nvm-1.img,if=none,id=nvm-1 -device nvme-ns,drive=nvm-1 -drive file=nvm-2.img,if=none,id=nvm-2 -device nvme-ns,drive=nvm-2
1
2
3
4
5
6
7/sys/devices/pci0000:00/0000:00:04.0/nvme
/sys/devices/pci0000:00/0000:00:04.0/nvme/nvme0
/sys/devices/pci0000:00/0000:00:04.0/nvme/nvme0/nvme0n1
/sys/devices/pci0000:00/0000:00:04.0/nvme/nvme0/nvme0n2
/sys/devices/virtual/nvme-subsystem
/sys/devices/virtual/nvme-subsystem/nvme-subsys0
/sys/devices/virtual/nvme-subsystem/nvme-subsys0/nvme0添加两个nvme设备,分别创建一个namespace
1
qemu-system-x86_64 -device nvme,id=nvme-ctrl-0,serial=deadbeef-ctrl0 -drive file=nvm-1.img,if=none,id=nvm-1 -device nvme-ns,drive=nvm-1 -device nvme,id=nvme-ctrl-1,serial=deadbeef-ctrl1 -drive file=nvm-2.img,if=none,id=nvm-2 -device nvme-ns,drive=nvm-2
添加两个nvme设备,其中一个nvme设备包含一个namespace,另一个包含两个namespace,两个nvme设备分属于两个subsystem
1
qemu-system-x86_64 -device nvme,id=nvme-ctrl-0,serial=deadbeef-ctrl0 -drive file=nvm-1.img,if=none,id=nvm-1 -device nvme-ns,drive=nvm-1 -device nvme,id=nvme-ctrl-1,serial=deadbeef-ctrl1 -drive file=nvm-2.img,if=none,id=nvm-2 -device nvme-ns,drive=nvm-2 -drive file=nvm-3.img,if=none,id=nvm-3 -device nvme-ns,drive=nvm-3
1
2
3
4
5
6
7
8
9
10
11
12/sys/devices/pci0000:00/0000:00:04.0/nvme
/sys/devices/pci0000:00/0000:00:04.0/nvme/nvme0
/sys/devices/pci0000:00/0000:00:04.0/nvme/nvme0/nvme0n1
/sys/devices/pci0000:00/0000:00:05.0/nvme
/sys/devices/pci0000:00/0000:00:05.0/nvme/nvme1
/sys/devices/pci0000:00/0000:00:05.0/nvme/nvme1/nvme1n2
/sys/devices/pci0000:00/0000:00:05.0/nvme/nvme1/nvme1n1
/sys/devices/virtual/nvme-subsystem
/sys/devices/virtual/nvme-subsystem/nvme-subsys1
/sys/devices/virtual/nvme-subsystem/nvme-subsys1/nvme1
/sys/devices/virtual/nvme-subsystem/nvme-subsys0
/sys/devices/virtual/nvme-subsystem/nvme-subsys0/nvme0添加两个nvme设备,其中一个nvme设备包含一个namespace,另一个包含两个namespace,两个nvme设备属于同一个subsystem
1
qemu-system-x86_64 -device nvme-subsys,id=nvme-subsys-0,nqn=subsys0 -device nvme,id=nvme-ctrl-0,serial=deadbeef-ctrl0,subsys=nvme-subsys-0 -drive file=nvm-1.img,if=none,id=nvm-1 -device nvme-ns,drive=nvm-1 -device nvme,id=nvme-ctrl-1,serial=deadbeef-ctrl1,subsys=nvme-subsys-0 -drive file=nvm-2.img,if=none,id=nvm-2 -device nvme-ns,drive=nvm-2 -drive file=nvm-3.img,if=none,id=nvm-3 -device nvme-ns,drive=nvm-3
1
2
3
4
5
6
7
8
9
10
11
12
13
14
15
16
17/sys/devices/pci0000:00/0000:00:04.0/nvme
/sys/devices/pci0000:00/0000:00:04.0/nvme/nvme0
/sys/devices/pci0000:00/0000:00:04.0/nvme/nvme0/nvme0c0n1
/sys/devices/pci0000:00/0000:00:04.0/nvme/nvme0/nvme0c0n2
/sys/devices/pci0000:00/0000:00:04.0/nvme/nvme0/nvme0c0n3
/sys/devices/pci0000:00/0000:00:05.0/nvme
/sys/devices/pci0000:00/0000:00:05.0/nvme/nvme1
/sys/devices/pci0000:00/0000:00:05.0/nvme/nvme1/nvme0c1n2
/sys/devices/pci0000:00/0000:00:05.0/nvme/nvme1/nvme0c1n3
/sys/devices/pci0000:00/0000:00:05.0/nvme/nvme1/nvme0c1n1
/sys/devices/virtual/nvme-subsystem
/sys/devices/virtual/nvme-subsystem/nvme-subsys0
/sys/devices/virtual/nvme-subsystem/nvme-subsys0/nvme0n1
/sys/devices/virtual/nvme-subsystem/nvme-subsys0/nvme1
/sys/devices/virtual/nvme-subsystem/nvme-subsys0/nvme0n2
/sys/devices/virtual/nvme-subsystem/nvme-subsys0/nvme0
/sys/devices/virtual/nvme-subsystem/nvme-subsys0/nvme0n3
qemu中添加fat用于共享目录
1 | qemu-system-x86_64 -hdb fat:rw:path-to-shared/shared |
qemu创建ubuntu启动镜像
1 | $ qemu-img create -f qcow2 ubuntu.qcow2 10G |
